
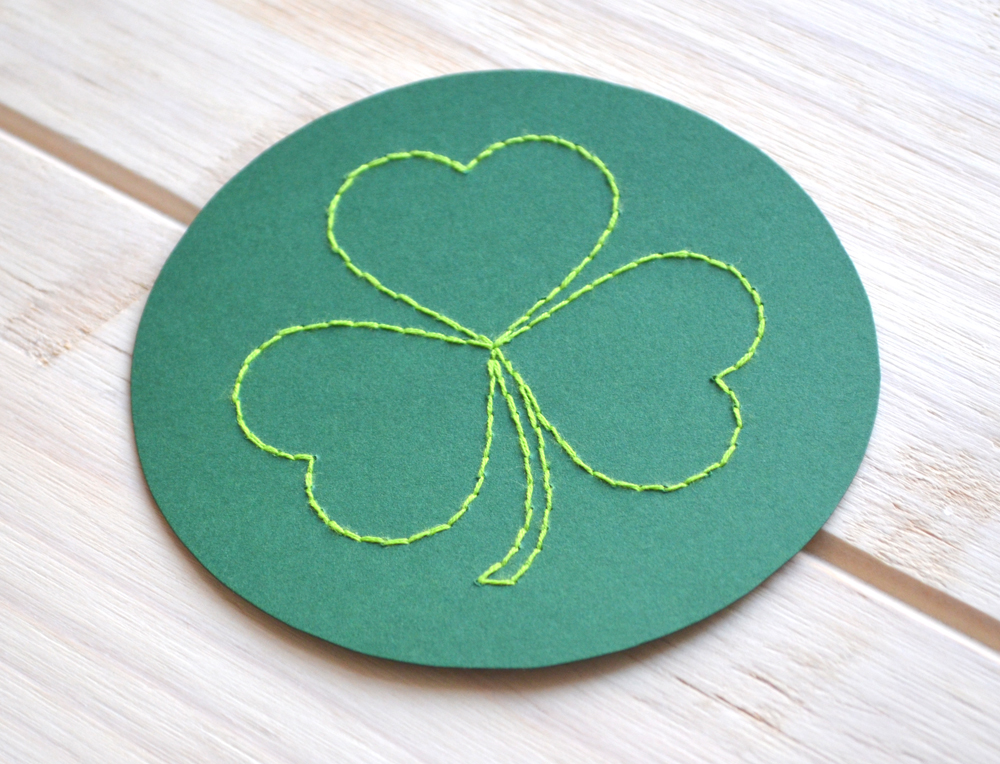
Saint Patrick’s Day is generally not a card holiday in my experience, so I thought I’d try a project more relevant to the holiday: coasters for beer! Full instructions and template after the jump.
Saint Patrick’s Day is generally not a card holiday in my experience, so I thought I’d try a project more relevant to the holiday: coasters for beer! Full instructions and template after the jump.
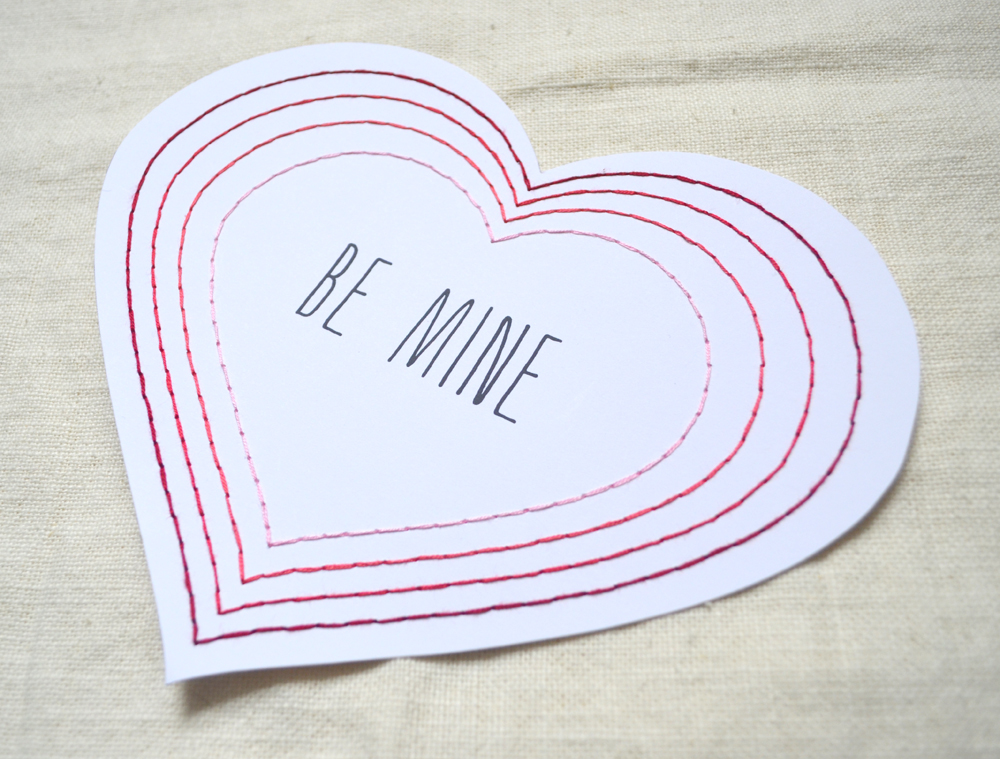
Presenting a tutorial for one embroidered Valentine heart! Complete with template downloads and step-by-step directions. Check it out after the jump.
I had made a card display for my last show that turned out pretty well, but for my spring show I wanted to try something different.

First and foremost, I wanted to create something with more capacity. As you can see in the above photo, the display can hold 15 cards maximum. Another problem was that the fold up stands and the dowels were too big to fit in the suitcase, and so they had to be carried by hand. The setup was a bit cumbersome as well. Finally, whenever someone purchased a card, it was really difficult for me to reach the middle cards.
The major benefits of this display were that I had a spot behind the curtain to hide my inventory sheet or to eat a quick lunch. I also felt that getting the cards up vertically really helped to draw people to the table.
With these lessons in mind, this is the result of my second try:

Basically I assembled two stretcher frames and then hinged them together. Using stretcher frames instead of picture frames is much cheaper and allows you to customize the size to exactly what you want. Since the wood is raw you could paint it to your shop colors (I liked the raw wood), and you get a nice vertical display for your merchandise.
The new display design resolved my major problems with the previous display. I can fit up to 24 cards on this display, up from 15 previously. It folds flat for easy transportation, so I can hang the frame over my shoulder and have my hands free for the suitcase. It’s super easy to set up, and the curtain is attached from the back so I can flip it up to easily grab items off the strings from behind.
Instructions on how I built the display after the jump:
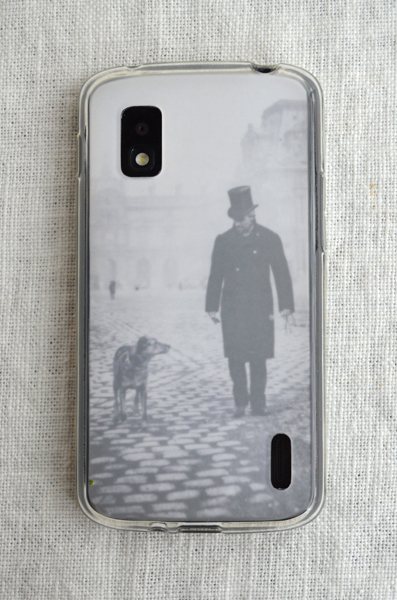
I’ve owned two Android phones and one iPhone, and my preference remains firmly with Android. One major drawback to Android (other than the app store, which is rapidly improving) is the lack of selection of phone cases. Since Android phones come in such a large variety of shapes and sizes, you usually only have a choice between black, white and some other basic colors. If you can find a clear case for your flat-backed smartphone, I’ve figured out a way you can customize your case a bit. Instructions after the jump. Continue reading

I have my first craft show coming up and I’m pretty excited and nervous. I’m trying to counteract the nervousness by being as prepared as possible.
One huge difference between selling live and selling online is that you need to totally rethink the way you display things. For my Etsy shop I do my best to take nice photographs, but since my items are all 2D I just show them flat on a plain background. For my table I needed to figure out a way to display my items vertically so that shoppers walking by can actually see what I’m selling.
I had two major restrictions on my display, it needed to fold flat for ease of transportation/storage and be relatively cheap. Since I’m new to the whole craft show scene I’m not quite ready to commit to a large investment until I have a better idea of what works and how often I’ll be doing these shows.
I did a lot of searching on flickr’s Show Me Your Booths group and found a lot of really nice displays. Many displays use a spinning rack, like you see in stores, or tiered wood racks. Unfortunately both of these solutions violate my criteria of being cheap and relatively flat. Another common theme I saw was the use of clothespins and string to display flat items. I really loved this display by Your Secret Admiral, where she uses a wood frame to hang strings and then pins her cards with mini clothespins.
With this idea I headed to Michaels to try to find some way to create a base and stand for my clothespin card display. After a failed attempt with buckets of stones and sticks, I found two wire folding-easel wreath stands. Only $2.50 each! I bought a dowel and after a bit of black paint, I ended up with this:

The dowel sits where the wreath would hang, and I have it attached with twisty ties. Then I swung by goodwill and bought an old black curtain. I cut it up and sewed covers for my two stands:

I took the top part of the curtain that I had left intact and hung it on the dowel through the existing pocket to create a solid background for my cards. On the stand covers I left strategically placed gaps in my seams so that I could sneak string through the seam and tie it to the wire frames. Unfortunately, at this point I discovered that the tension of the string would pull the bases together. After a LOT of experimenting (which I did not document) I finally settled on adding another pole across the bottom, which I twisty tied to my stands to hold everything in place. The hanging curtain covers the pole across the bottom. My finished product looks like this now:

Apologies for the terrible photos, at this point I had been fiddling with the thing for awhile and I didn’t want to re-set up the whole display with better lighting/positioning. I’m debating sawing off the ends so the top looks less awkward, or expanding the bottom to make the display wider.

Once I figure out how I will acquire a table I will stage my entire table setup to see how the whole thing works together. Otherwise my backup plan is lots of baskets!
So quite awhile ago I wrote about turning the pins that once adorned my backpack into magnets. I mentioned that they were meant for another project, but lazy me didn’t get around to writing about it until now, while other projects are in progress but far from complete.
It all began with this image:

Part of me wonders if I should even share these images, since my photography/styling/execution can never hope to compete…anyway! They included a tutorial, available here.
So here’s my attempt and result. To summarize, basically you add adhesive to the board, stick the map on the front and wrap it around the sides, add more adhesive on top and let it dry.

I started with one IKEA SPONTAN board, hauled out from Brooklyn, a map of Asia purchased via Etsy and miscellaneous brushes and Modge Podge (not pictured).

I started with the first adhesive product (shown above) but it wasn’t making things stick well, so I got some Modge Podge proper which did the job.

I wrapped as much map as I could around the edges and added adhesive. Two lessons learned: 1) Buy a really big map (surprisingly difficult). My map didn’t quite cover the edges for a really nice finished look on the sides of the board 2) If at all possible, buy a map that has been rolled, not folded. Despite all my efforts to flatten and smooth, once the modge podge dried I could still see wrinkles.
Here’s what it looked like with the Modge Podge applied:

It went on looking like paste but dried clear. The strokes of the brush are still visible though. 
And here it is immediately after being finished and drying on the wall. I added another layer of the original adhesive, which acted like a sealer, since the Modge Podge was still tacky even after drying overnight.

And here’s what it looks like today, several months after being completed. It’s usually a bit more messy (right now it has a to-do list, coupons and my jury duty summons -_-), but it’s a super convenient place to keep stuff and looks decent when it’s empty. My apartment may not be house tour-worthy but at least my memo board is slightly more stylish 😛
I’ve had the same sewing box since I was a kid, and some of the thread and needles are only slightly younger than me. I don’t sew very often, so I’ve built up a collection of infrequently used thread. During a recent project, I decided I was sick of the mess of spools with loose threads everywhere and took some time to clean it up.

Nice and organized! I cut some cheap takeout chopsticks to fit the width of my sewing box and strung the spools of thread onto each chopstick. There is a little ridge around the parameter of the box, so I used that to rest the chopsticks on.

Under the spools of thread are some smaller notions that I’m keeping “just in case” but likely won’t get used anytime soon. Now I can see what thread is available at a glance.

Late in the evening after decorating my tiny apartment-sized Christmas tree, I decided that I needed a nice big star to top the tree. This is an origami pattern I learned a long time ago, so long that I don’t remember the source. I regularly forget how to make it and then spend 20 minutes trying to make it work, so I thought I’d post it online in case I forgot again…pardon the dark photos. Continue reading
I had a pile of pins that I used to keep on a cork memo board over my desk. I will be switching my corkboard for a magnet board soon, so I was left wondering what to do with the pins. They seemed like the perfect size for magnets for my new board, so I converted them.

Part I, on how to make the flower, is here. This second section is on how to make the stem. Continue reading

